

GroupHunter Documentation
Docy is a powerful, responsive, and high-performance online documentation WordPress theme that can assist you quickly develop your next product’s documentation. It can be used for documenting API, frameworks, plugins, templates, software, manual etc. It includes a lot of elements to make your interactive documentation efficiently.
Articles
FAQs
Frequently asked questions and answers.
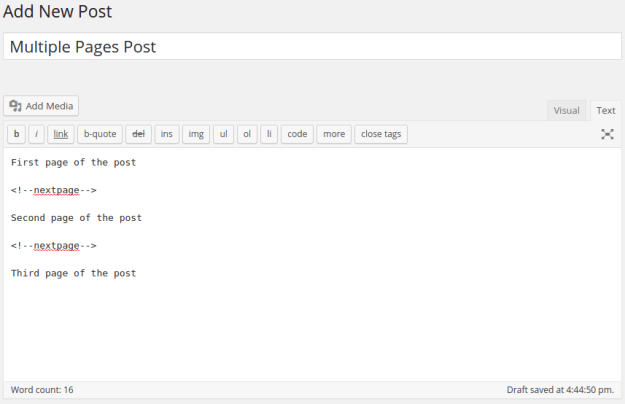
How to Paginate a Post?
In order to paginate your blog post or page, in the Write panel in your WordPress admin, switch to the TEXT view (if you are using the Visual view) and then enter the following code to wherever you want to break the post up into a new page:
<!--nextpage-->
How to set site’s favicon?
Go to Appearance > Customize > Site Identity. Then Select an image as site icon-
![]()
How to apply custom CSS code.
You can apply your own custom CSS code on Gullu theme. Your custom CSS code will not be lost even if you update the theme.
Navigate to Appearance > Customize > Additional CSS
Take a look at the screenshots-

New Doc TItle
Getting Started
Installing & Setting Up GroupHunter
Changelogs
Welcome to docbuzz ! Get familiar with the Stripe products and explore their features:
To use Docbuzz WordPress theme you must have WordPress engine installed. We assume you have a working version of WordPress already up and running. We also encourage you to actively use the links below. These useful resources cover most of the general WordPress questions you may have:
- What is WordPress? Wikipedia and WordPress FAQ Read here!
- Tutorial on how to Install WordPress? Watch Video
- WordPress Lessons Visit Articles
Changelogs Timeline
Second Depth
To use Docy WordPress theme you need to have a WordPress 4.0 (or higher version) site with PHP 5.6 or more and MySQL 5.0+ running on your hosting server. If you’ve already installed WordPress on your server and your site is up, that’s great. For help regarding WordPress installation, please see this WordPress Codex link.
Some more resources from WordPress Codex:
Demo Import
If you want your site to look like exactly the ‘Rogan’ demos, you have to import the demo content. We integrated the One Click Demo installation feature in Rogan. You can import the demo content by a click only.
Install the theme and activate it. Then install all the required plugins. Make sure all the required plugins are activated before you begin. Then navigate to “Appearance > Import Demo Data” to import the demo data and click on the “Import Demo Data” button.
After Demo Import
After successfully importing the demo content, you will find all the pages in your WordPress admin dashboard’s Pages menu. Find your desired homepage there and start editing this page with Elementor.
Also, you can set your Homepage demo as the Frontpage of your website from Settings > Reading.
Tips: Clean your WordPress site before reinstalling a Demo. You can clean your WordPress with the WP Reset plugin.
An alternative method to import the demo content.
However, you will get all demo content data with the theme package. You will find the demos in ‘rogan>inc>demos this path. If you failed to import the demo content with one click then you have to follow the below steps to import the demo content manually.
- Navigate to Tools > Import then install the WordPress plugin and click on the ‘Run Importer’. Upload here the ‘contents.xml’ file.
- Install the ‘Widget Importer & Exporter‘ plugin to import the demo widgets. Then navigate to Tools > Widget Importer & Exporter and upload here the ‘widgets.wie’ file.
- Now you have to import the Theme Settings as like the demo. Navigate to ‘Theme Settings > Import / Export‘. Then click on the Import from File button and copy-paste the backup string here and click on the Import a Backup button. You will find the backup string in the settings.json file.
Plugins Installation
After activating the Rogan WordPress theme, you will see a message that tells you to install some required and recommended plugins, click on Begin Installing Plugins or if you can’t see that message, Go to Appearance > Install plugins and star install all the plugins
Next step select all the plugins and change the drop-down menu to Install then click on the Apply button and wait for the installation process.
After installing plugins you will redirect to plugins list, again select all the plugins and change drop down this time to Activate and click on Apply button then wait for the activation process.
If you faced any problem or couldn’t install plugins, feel free to open a support ticket.